
3D Printer Setup Guide: From Box to First Print

Design and making background since school. Bambu Lab owner — regularly printing projects with my kids and practical fabrications around the house. 3D printing sits right where design thinking meets problem solving.
Just so you know, some links on this page are affiliate links. If you buy something via them, we get a small kickback. You don't pay more, but it helps toward filament and test prints.
A 3D printer is what turns a file into a physical object you can hold and test. Setup is the bridge between unboxing and that first successful print, and how carefully you do it determines whether your first week feels like a breakthrough or a frustration. Here is the complete process.
What's in the Box Most printers ship partially assembled. Expect: - Pre-assembled base and gantry (or separate pieces to join) - Print head assembly - Spool holder and filament sample - Power supply and cables - Tool kit (Allen keys, screwdriver, snips) - SD card with test files and slicer software
Assembly: Kit vs Pre-Assembled Pre-assembled printers (Bambu Lab, most Prusa): 15-30 minutes to set up. Attach spool holder, plug in cables, level bed, done.
Kit printers (Ender 3 series): 1-3 hours. You'll bolt together the frame, mount the gantry, route cables, and install the print head. Watch the manufacturer's video first.
Take your time with assembly. Squared frame and tight belts matter. Rushing creates problems you'll chase for weeks.
First Power On Before printing anything: 1. Check all connections are secure 2. Verify the bed heater works 3. Verify the hotend heater works 4. Run the motors in each axis, listen for grinding 5. Check belt tension (firm but not guitar-string tight)
Bed Leveling This step determines whether your first prints succeed or fail.
Auto bed leveling (ABL): Run the auto-level sequence. It probes multiple points and compensates for bed irregularities.
Manual leveling: Heat the bed to printing temperature (60C for PLA). Use paper between nozzle and bed at each corner. Adjust until you feel slight resistance when pulling the paper. Repeat until all corners match.
The first layer is everything. If it doesn't stick or looks wrong, fix leveling before printing anything else.
Software Setup You need a slicer to convert 3D models into printer instructions.
Cura: Free, works with most printers, excellent preset profiles PrusaSlicer: Free, great for Prusa printers, works with others Bambu Studio: Required for Bambu printers, excellent interface
Install your slicer, select your printer model, and use default settings initially. Optimization comes later.
First Print Most printers include a test file on the SD card. Print it first. Typical options: - Calibration cube (XYZ cube): Tests dimensional accuracy - Benchy boat: Tests overhangs, bridges, and details - Cat/dog/test object: Simple print to verify setup
Watch your first print closely. The first few layers reveal leveling issues. Don't leave until you've confirmed good adhesion.
Essential Tools A few inexpensive tools make setup and printing much easier. Digital calipers let you measure print accuracy and filament diameter. A scraper set helps remove prints safely without damaging the bed. *(Prices when reviewed: Calipers ~$12, Scraper set ~$10 | Check calipers | Check scraper set)*
Where to Find Models Thingiverse: Largest collection, variable quality Printables (Prusa): Curated, higher average quality MyMiniFactory: Good for miniatures and decorative items Thangs: Search across multiple sites
Start with simple models. Complex prints reveal printer issues, but they're harder to troubleshoot.
Calibration: The Step Most Beginners Skip
Assembly and bed leveling get you to a working printer. Calibration gets you to a good printer. Run these in order before printing anything complex.
1. Z-offset fine-tuning After auto-leveling, the Z-offset sets the exact gap between nozzle and bed. The goal: filament squishes slightly into the bed surface on the first layer, creating a bond without over-flattening.
Too high: filament strands separate, poor adhesion, prints pop off. Too low: nozzle drags, filament won't flow, scratches the bed.
Adjust in 0.05mm increments while a first-layer test print runs. Watch the first layer live. When lines merge together without gaps and without a raised ridge, the offset is correct.
2. E-steps calibration The extruder steps (e-steps) determine how much filament the printer feeds per unit of movement. If your extruder is over- or under-extruding, prints will be dimensionally wrong, weak, or have gaps.
Mark 120mm on a filament above the extruder. Command 100mm of extrusion. Measure how far the mark moved. If it moved more or less than 100mm, recalculate: new e-steps = (current e-steps × 100) / actual mm extruded.
3. Temperature tower Every filament brand and color prints differently. A temperature tower prints the same object at decreasing temperatures, showing you where your specific filament performs best.
Download a temperature tower from Printables. Import into your slicer. Add temperature change commands at each transition height. Print it and compare sections. The best-looking section reveals your optimal temperature.
4. Retraction calibration Retraction pulls filament back before travel moves to prevent oozing and stringing. Too little: strings everywhere. Too much: gaps and jams.
Print a retraction test (two thin towers with a travel move between them). Start with 0.5–1mm retraction on direct drive, 4mm on Bowden. Adjust up in 0.2mm steps until stringing stops. Don't exceed 2mm on direct drive or 7mm on Bowden.
Slicer Settings: What Actually Matters
Most slicer settings can be left at default. These four have the biggest impact on print quality and reliability.
Layer height: 0.2mm is the standard starting point. It balances quality and print speed. Lower (0.12mm) for detailed prints. Higher (0.28mm) for functional parts where speed matters more than surface finish. Never go below 25% of your nozzle diameter (0.1mm for a 0.4mm nozzle).
Print speed: Start slow. 40–60mm/s for your first prints. Once you understand your printer's behaviour, increase gradually. Fast printing exposes every calibration problem. Slow printing forgives imperfection.
Supports: Enable for overhangs steeper than about 45 degrees. Set support interface layers to 2 for easier removal. Increase support Z-distance if supports are fusing to the print surface.
Infill: 15% gyroid for decorative objects. 25–40% for functional parts. 60%+ for structural parts under load. Infill pattern matters less than percentage for most uses. Gyroid and cubic patterns distribute load better than grid in all directions.
Printer-Specific Setup Notes
Creality Ender 3 V3 SE: - Run CR Touch auto-leveling before every print session until you trust it (then it becomes optional) - The default Z-offset is rarely perfect, fine-tune live during first layer - PEI bed grips PLA well without adhesive; use a thin glue stick layer for PETG
Bambu Lab A1 Mini / X1 series: - The first-run calibration sequence handles most of this automatically - Bambu Studio's default profiles are well-tuned, trust them until you have a reason not to - AMS multi-color setup requires purge tower configuration, start with single material to learn the machine
Flashforge Adventurer 5M: - Enclosed chamber means less environmental calibration needed - The quick-swap nozzle system makes 0.4mm → 0.6mm changes take seconds, useful for large functional prints - Run the auto-leveling and Z-offset calibration through the touchscreen before first use
Prusa MK4S: - PrusaSlicer profiles are optimised specifically for this machine, use them - Input shaper calibration is automatic on startup; let it complete before printing - Live Adjust Z is accessible during printing from the knob menu, fine-tune first layer while printing
Safety During Setup
3D printing is safe for home use, but a few precautions from the start prevent problems later.
Thermal runaway protection: Verify your printer has it enabled. All machines listed in our guides do. This safety feature cuts power to the heaters if temperature readings become erratic, it's the primary protection against runaway heating. Check your firmware settings confirm it's active.
Placement: Set the printer on a flat, stable, non-flammable surface. A solid desk or shelf is fine. Keep it away from paper, fabric, and anything flammable. A smoke detector in the same room is sensible regardless of what you print.
Enclosure consideration: PLA fumes are minimal at standard temperatures. ABS and ASA produce fumes that warrant ventilation or an enclosed printer with carbon filter. If you're printing ABS in a confined space, ventilate actively.
During unattended printing: The first ten to twenty prints on any new machine should be supervised until you trust how it behaves. Once you're confident in the setup, thermal runaway confirmed, bed adhesion reliable, no unusual sounds, unattended printing is fine.
Our bed leveling guide is critical reading, and our first print guide walks you through what to expect from your first few prints.
Printer-Specific Setup Notes
The setup process shares common steps across most printers, but specific models have quirks worth knowing before you start.
Creality Ender 3 V3 SE: The most beginner-friendly Creality setup. The CR Touch ABL and direct drive extruder mean bed leveling is largely automated. Run the automatic leveling routine fully before the first print. The default Z offset stored in firmware is rarely correct for the actual first print; use the live Z adjust during the first print and save.
If you are new to 3D printing, the best 3D printers for beginners US covers the most forgiving machines to start with.
Creality Ender 3 Pro/V2 (older models): Manual bed leveling only. Use the paper test across all four corners and the center. The springs under the bed compress over time and need regular retightening. Consider upgrading to stiffer springs (~$5-8) and a PEI spring steel sheet as early investments.
Bambu Lab A1 Mini: Largely self-configuring. Run the full calibration routine after assembly and let the automatic Z offset work. If AMS is included, ensure filament paths are clear and PTFE connectors are fully seated before loading filament.
Prusa MK4: Kit assembly takes 8-10 hours for a first-time builder. Take your time on the wiring harness routing, incorrect routing causes cable strain that fails over time. Follow Prusa's online documentation precisely.
Your First Slicer Setup
A slicer converts your 3D model file into the movement instructions your printer reads. The two main free options are PrusaSlicer and Bambu Studio (which works with any printer, not just Bambu machines).
Recommended starting slicer: PrusaSlicer for Creality and Prusa machines. Bambu Studio for Bambu machines. Both are free.
When setting up your printer profile: - Select the exact printer model (not a generic profile) - Set bed dimensions accurately, oversized prints that exceed the bed will fail at the edge - Configure nozzle diameter (usually 0.4mm) - Set filament type and temperature to match your material
The most important slicer settings for a first print: - Layer height: 0.2mm for standard quality, 0.15mm for better detail - Print speed: Start at 50mm/s, increase later once calibrated - Supports: Enable automatic supports for overhangs beyond 45 degrees - Infill: 15-20% for display models, 30-40% for functional parts
Enclosure: Do You Need One?
You need an enclosure if you plan to print: ABS (warps severely without one), ASA, nylon, high-temperature engineering materials, or in a very cold environment (below 60°F ambient) where PLA prints develop layer splitting.
You don't need an enclosure for: PLA (prints excellently open frame), PETG (generally fine without, though draft protection helps), standard hobby printing.
If you add an enclosure later, the IKEA LACK table enclosure is a popular DIY option for Ender 3-sized printers. Commercial enclosures are available from around $60-80.
Network Printing and Remote Monitoring
OrcaSlicer with network integration: OrcaSlicer supports direct network printing to Bambu machines and, via plugins, to Klipper-based printers.
Octoprint (Raspberry Pi): The standard solution for non-networked printers. A Raspberry Pi 3B+ or 4 running Octoprint provides web-based monitoring, remote control, webcam monitoring, and a plugin ecosystem. Raspberry Pi 4 2GB with a case and SD card runs around $50-60. *(Price when reviewed: ~$55 | Check Price on Amazon)*
Mainsail/Fluidd (Klipper): If you install Klipper firmware, these provide a web interface for monitoring and control. The standard interfaces for the Klipper ecosystem.
Common Setup Mistakes and How to Avoid Them
Skipping extrusion calibration: The extruder steps/mm (e-steps) determines how much filament gets pushed per unit. Out-of-calibration e-steps cause consistent over or underextrusion. Mark 4 inches on your filament, command the extruder to move that amount, and measure what actually moved. Adjust e-steps until the measurement matches.
First layer too thin or too thick: Get the Z offset right before committing to a long print. Too thin and nothing adheres. Too thick and the nozzle clogs.
Not watching the first layer of every new print setup: Five minutes watching the first layer establishes whether the print will succeed. Catching a bad first layer early saves hours of printing time and material.
First Prints: A Recommended Sequence
The order of your first few prints matters for building calibration confidence.
Print 1: Bed leveling test (single layer), A single-layer square covering most of the bed reveals leveling issues immediately. Takes 5 minutes to print. Fix any issues before moving on.
Print 2: 20mm calibration cube, Standard reference object for dimensional accuracy. Measures should be within 0.2mm of 20mm on all three axes. If X and Y are correct but Z is off, adjust e-steps or flow rate.
Print 3: Benchy, The 3D printing community's standard benchmark object. Combines overhangs, bridges, fine detail, and curved surfaces. Results tell you exactly which settings need refinement.
Print 4: The thing you actually want, Once calibration is verified, print something useful. The satisfaction of a successful useful print is the best motivation to continue learning.
This sequence takes 2-3 hours and gives you a calibrated printer with reliable results for everything that follows.
Connecting to Thingiverse and Printables
Two resources you'll use constantly once the printer is running:
Printables.com: Managed by Prusa Research, with quality ratings and community feedback on print settings. The search and filtering is better than Thingiverse. Models often include slicer settings that worked for the uploader's setup. Free to use without an account, though creating one lets you save collections.
Thingiverse.com: The original and largest repository of free 3D models. Quality is highly variable, some models are excellent, others have design flaws. Check the "makes" section (photos of other users' printed versions) before printing to see real-world results. The remix culture on Thingiverse means popular models often have multiple improved versions.
Both sites have a "Remix" culture, if you want a model slightly different from what exists, check whether someone else has already remixed it to match your needs before starting a design from scratch.
The calibration sequence from print 1 to print 4 can be completed in a single afternoon session. Most of the learning in 3D printing happens in those first few prints, so investing the time upfront in proper calibration pays dividends in every print that follows. A well-calibrated printer makes every subsequent print more predictable, reduces wasted filament on failed prints, and builds the intuition needed to diagnose problems quickly.
What You'll Need With It
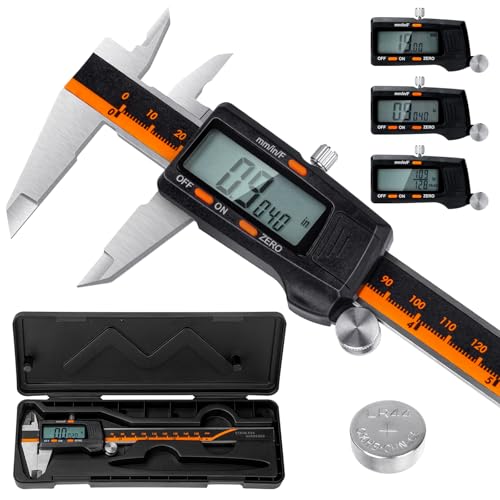
Laboratory-grade accuracy (0.01mm resolution, ±0.02mm accuracy) for measuring filament diameter, print dimensions, and calibration. Hardened stainless steel construction. Essential for proper calibration and quality control.

Double-sided magnetic flexible build surface (smooth and textured PEI). Excellent adhesion for PLA, PETG, ABS, TPU without glue. Easy part removal by flexing the spring steel. Solves warping and adhesion issues.

360° all-round heating filament dryer with dual internal heating plates and built-in fan. Heats to 70°C. Touch screen displays temperature and humidity. Feed-through design allows printing while drying. Fixes moisture issues causing stringing and weak layers.
As an Amazon Associate, we earn from qualifying purchases.